

Pretty incredible to power up and have my OS intact! Note to self: going from X58 to H67 means no reinstall (so far).
Performance looks where it should be, no issue except my TB Hitachi doesn't seem to list POST in AHCI mode.
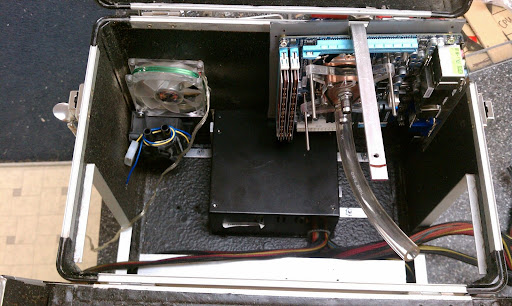
Pump is almost purged and not so Whooshy anymore.
I need to finish the trim pieces that will go around the PSU.
I need to drill my retention pin system for keeping the RadBay doors closed while I carry it.
Everything else worked out like I knew a little something about what I was doing! :) Throughout the planning, fitting, cutting, etc. I had numerous thoughts that it "all seemed to be going pretty smoothly" considing I had ONE case, didn't have to recut or cover some cosmetic mistake, and all my wiring just...worked.
Now, I did destroy my first PSU, the Enermax, when I melted a switch that took over 700F from my soldering iron to get apart. But seriously, that PSU was like 6 years old!
I didn't buy a new PSU. I didn't buy a new GPU. I didn't buy new RAM. I didn't buy a new CPU block. I didn't buy a new SSD. I didn't buy a new storage drive.
Sponsors (in one fashion or another) provided:
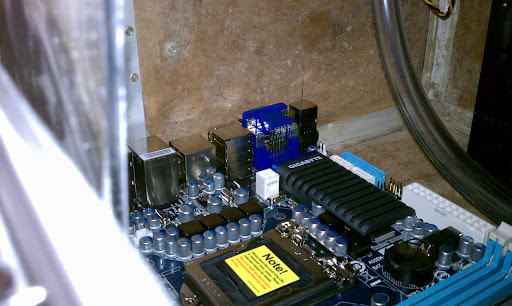
Motherboard by Gigabyte
RAM by Crucial
Storage Harddrive by Hitachi
Monitor is still my 22" by iZ3d
Keyboard is my Ideazon won in PDXLAN raffle
Mouse is GX700 by Logitech
Headphones are Psyko 5.1s won in PDXLAN raffle
Radiators and fittings by DangerDen
Getting back into modding has been a nice process, even if I was stressed at times. But here I am, ready for Guild Gaming tomorrow night on my Refreshed Rig, and over 2 weeks before the LAN to finish my few, small tasks.
Thanks for watching...check back as the LAN approaches since I will be putting together more complete internal shots and going back over some of the "tricks" I used that I didn't stop to cover these last couple days.
Mod'on
Subscribe To Dgephri's Mod Blog
Thursday, June 30, 2011
Wednesday, June 29, 2011
It turned on!
Watching case temps carefully since I only have a 25cfm 80mm drawing exhaust from a less-than-ideal location. So far all the components are working. Me happy!
EDIT 4:19pm. Didn't even have to reinstall windowz! Going from an X58...to the H67, I had my external BD/DVD drive hooked up to the USB3 port (since it's USB3 ready) but the drivers won't do OS install from that port I guess. But I got login and desktop, put the OEM driver disk in, and it's at desktop and I'm typing this on it.
My pump still is bubbly and making all kinds of whooshy noises, but weird loops like this take quite a while to get the microbubbles out in my experience.
WOOOOOOOOOOOOOOOOOOOOOOOOOOOOOOOOOOOOOOOOOOOT!
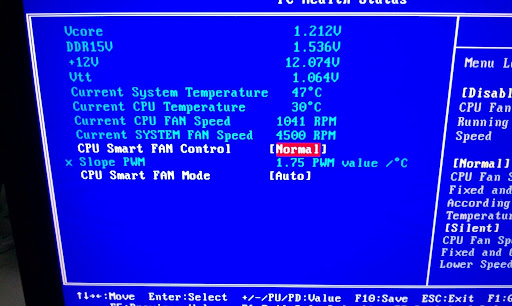
Running Windows Experience Index (not a great benchmark, but at least it breaks out to some subsystems:
1. 980X CPU was a 7.9: 12 threads 2500K CPU is a 7.5.
2. 6Gig Tri-Channel DDR3 was a 7.9 4Gig Dual-Channel DDR3 is a 7.6
3. 480GTX for both graphics scores is unchanged (not CPU bottlenecked) at 7.9
4. SSD for Primary disk is unchanged at 7.6 (not Sata6Gps)
Published with Blogger-droid v1.7.2
fluid, purge, fluid, purge, fluid, purge
the above is my process to eliminate bubbles in the horrible layout that is required to actually FIT the stuff into this case:
the pump circuit is not ideal
the GPU is inverted and the highest point in the system
the radiadors share a tube along the BOTTOM
the T-line is right above the pump outlet with a 90 going to the GPU
the loop goes something like this:
pump up to T-line 90 to GPU
GPU DOWN to CPU central inlet
CPU outlet DOWN to right side Radiator
bottom of right side radiator along bottom of case to bottom of left side radiator
left side radiator top hook back down to pump.
hump hump 90 up, hump CPU hump radiator, hump radiator, hump back to pump.
after turning the external PSU (so I don't fire up the motherboard with an air-filled loop) can only run about 4 seconds before it sucks so much air I worry for the bearings, then tilt, let the bubble move to the T-line, then open T-line and fill back to top.
Repeat about 95 times...really, over 2 hours, not kidding here, 9pm to almost 11:30pm. Flick PSU, watch bubble, tilt case, take plug out of T-line, use syringe to fill T-line, put plug back in T-line, Flick PSU, repeat.
ONE Quarter-sized BUBBLE AT A TIME.
I finally got to let it run for about half an hour before I was tired of looking at it.
Am I done yet? :)
Monday, June 27, 2011
ugh...am I done yet?
I am so excited to be close to putting fluid in this sucker...but a bit tired of having my hands on it so much and my kitchen counter totally repurposed for it.
I don't think any of my previous Mods have required so many Install/remove/reinstall/repeat (maybe the doors on Lubic Zen-Feng, but that was a long time ago to remember exactly).
I probably put the radiators in and out 20 times before I got to mounting the Power supply, which probably went in and out 20 times before I moved on to the motherboard plate, which probably, blah blah blah, exhausted.
It's not the endless hours of filing like Bloodmoon, or the tedium of buffing like HTPCylon, or the tiresome superglue and optics on Lubic's starfield...but everytime I pick up the motherboard again, I might ding it, everytime I put the Video card back in I might drag it along the CPU posts. I hope it all works when I hit the button!
Tomorrow might be fluid and pump purging (crossing fingers!).
Step by step install test


First the case legs and power supply.
Second the motherboard without video card.
Third the left side radiator.
Fourth the right side radiator.
Fifth (not taken yet) the video card.
I have more shots to post as well as a video showing the completed tubing movement. Stay tuned!
Published with Blogger-droid v1.7.2
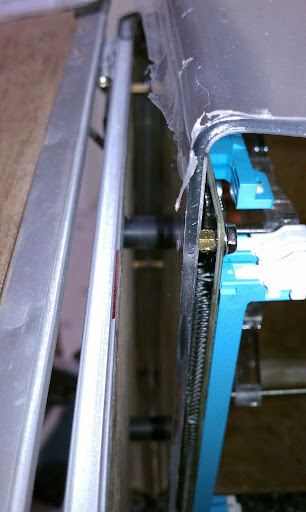
Pump mount + radiator slides + tubing = success!
Woot! omg it actually works!
Published with Blogger-droid v1.7.2
sponsor bump
just wanted to drop an additional note for those companies that helped with the current project:
Gigabyte-motherboard- ITX H67 USB3, etc.
Crucial-RAM - DDR3 Tracer in Red - originally a 3X2Gb set for my X58 build, but now using 2X2Gb.
Danger Den-140mm Radiators, fittings, waterblocks of old, fluid, tubing and other stuff over the years
Hitachi-1TB drive-ok, so it's not Sata-6Mpbs, but the original, enterprise class, 64Mb cache 7200 rpm drives are all still going strong.
Intel-technically not a sponsor of the project, but my previous CPU was won in the raffle at a PDXLAN, so...they deserve some credit on that one. :)
Logitech- what can I say about all my Logitech product support? Keyboards, Mice, speakers, headsets, remote controls, the list goes on. It started with the first G-15 (the Bath'leth I call it) and on through my current fave mouse the G-700.
I can't begin to count the cost/value of all the products provided, destroyed, modified, overclocked, painted, cut apart, and hotglued. Thanks to all my Sponsors for helping with my destructive hobby! ;)
Finally got the pump mounted.

Published with Blogger-droid v1.7.2
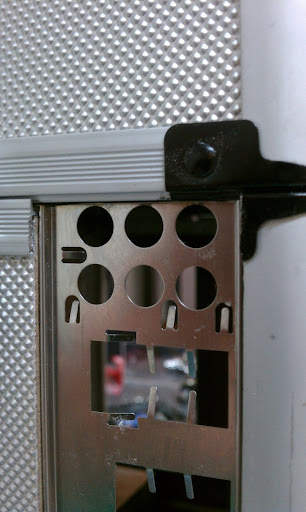
Port opening nearly done


Published with Blogger-droid v1.7.2
Sunday, June 26, 2011
Finally working on gpu


Published with Blogger-droid v1.7.2
Undercoating done


Published with Blogger-droid v1.7.2
Undercoating done


Published with Blogger-droid v1.7.2
Saturday, June 25, 2011
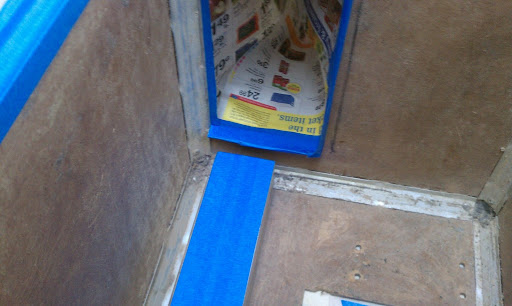
Case prep for install


Published with Blogger-droid v1.7.2
Friday, June 24, 2011
Fatality! Scratch one psu.

Not positive, but I think the dead power supply might have relationship to this messy leaky capacitor?
EDIT: OMGOMGOMGOMGOMG. Yes, I am stupid sometimes.
The mounting brackets use button head bolts and square nuts (I already had them, just, work with me here). ONE of the brackets has ONE bolt/nut that was pressing down on the Capacitor on the left side of the photo.
How did I discover this when I thought the PSU was dead? I went to plug my drill into the same outlet the PSU was in...and it was dead too. GFCI had tripped.
So I opened up the PSU, tested fine. Took the brackets off, shell back on, tested fine. Only one bolt/nut was anywhere near anything, so I opted to remove that bracket entirely, put the others back on, put the whole thing back together, tests fine.
UGH...stupid stupid stupid. :P
Published with Blogger-droid v1.7.2
Much work! Me do lots of stuff!


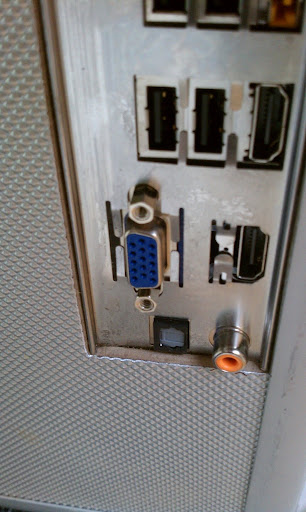

It can be really tricky to cut, file, smooth, and align it without overcutting.
Hold in place: mark: drill one: hold up in place again: mark: drill second: rinse repeat.
Working in a case made of particle board and aluminum sheets that only holds its shape when all latches are closed...very careful before deciding.
Before I took the shots of the mounting I probably put it in and out 15 times. Angle at the plugs; alignment for microphone jacks; dremel cut to remove the end flare of the I/O shield; adhesive to hold the shield in place; more and more until it JUST fits (still about 1mm I would adjust).
More coming: busy weekend so I can get wiring and tubing going.
Published with Blogger-droid v1.7.1
Friday, June 17, 2011
Wednesday, June 15, 2011
First door assembly


Published with Blogger-droid v1.7.0
Tuesday, June 14, 2011
Work starts again!

First I marked out a scrap piece of plastic. Drilled and tapped for my standoffs.

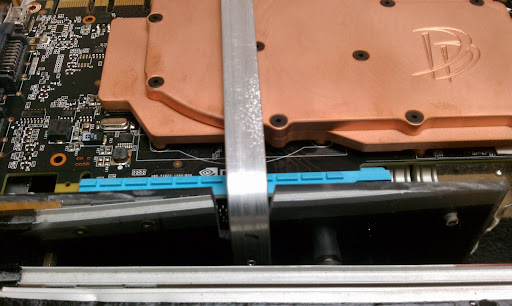
I decided I needed support for my gpu during any transport bouncing and so I bent a 90 that will cup over my waterblock.

Then I did some fitting to check clearance and harddrive location.
It's getting really hard to take photos between the funny lid arrangement and the cramped space. ;)
More coming!
Published with Blogger-droid v1.7.0
Monday, June 13, 2011
more to come soon
been forcing myself to do my Real Estate Continuing Education. I have to complete 30 hours by end of June or I can't work. ;)
Got 20 out of 30 so far.
I believe I have another supporter in Gigabyte. It looks like they are enjoying the project enough to provide an H67 motherboard.
I had hopes the Z68s would come in time...but no release dates from Gigabyte yet. That means OC on the CPU will have to wait.
Since I will have the mobo in hand soon, construction of the mounting and position fixtures will commence in short order.
PSU mount: done
Radiator slide system: done
slide system mounting: done
CPU: 2500K in hand
Motherboard: H67 on the way from Gigabyte
RAM: Ballistix Tracer DDR3 in hand from Crucial (might even get fancy with this, an old idea brought new)
Drives: Intel 160Gb SSD in hand, 1TB Hitachi 65Mb cache in hand, LG Blu-Ray combo Lightscribe in hand
GPU: 480GTX in hand...wishing for something to upgrade, but nothing is accessible.
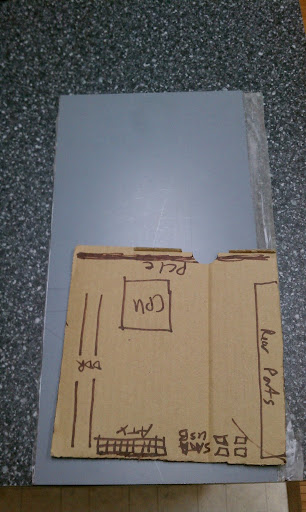
Main items remaining are motherboard location, mounting, backplane and GPU openings, Pump location, then tubing and power lines final issues.
I hope to be power'd up and testing by the end of June. :)
Got 20 out of 30 so far.
I believe I have another supporter in Gigabyte. It looks like they are enjoying the project enough to provide an H67 motherboard.
I had hopes the Z68s would come in time...but no release dates from Gigabyte yet. That means OC on the CPU will have to wait.
Since I will have the mobo in hand soon, construction of the mounting and position fixtures will commence in short order.
PSU mount: done
Radiator slide system: done
slide system mounting: done
CPU: 2500K in hand
Motherboard: H67 on the way from Gigabyte
RAM: Ballistix Tracer DDR3 in hand from Crucial (might even get fancy with this, an old idea brought new)
Drives: Intel 160Gb SSD in hand, 1TB Hitachi 65Mb cache in hand, LG Blu-Ray combo Lightscribe in hand
GPU: 480GTX in hand...wishing for something to upgrade, but nothing is accessible.
Main items remaining are motherboard location, mounting, backplane and GPU openings, Pump location, then tubing and power lines final issues.
I hope to be power'd up and testing by the end of June. :)
Monday, June 6, 2011
essential parts ordered, other stuff already on hand
Wanted to sound off that I already have support from Crucial. They had previously sent me 3X2Gig kit of Red tracer DDR3. In this mod I will use that memory but stick with the 2X2Gig layout of the H67 chipset.
Ordered my CPU (2500K) and a motherboard (the Z68s still have no street date, and I need to get measuring).
At least I can transplant other hardware over and get on with installs rather than waiting till the last minute to get the parts mounted and plumbing done. :)
Ordered my CPU (2500K) and a motherboard (the Z68s still have no street date, and I need to get measuring).
At least I can transplant other hardware over and get on with installs rather than waiting till the last minute to get the parts mounted and plumbing done. :)
Subscribe to:
Posts (Atom)