Wednesday, November 23, 2011

Finally taking some completion shots

not quite as nice as I had hoped...but the material offers some challenges with the focus on my 8MP phone...


I am going to charge and get my 7.2MP sony camera on a tripod and try again over the holiday.

Having done so many cases with removable panels, and windows, and such it's remarkable how LITTLE I can show of the interior since there are no openings in the hardware areas.  ;)

Friday, August 12, 2011

sorry for the delays

While I had many intentions, and many opportunities to get the "completed" shots taken, I just couldn't motivate to stop and do the prep.

I lost a close friend to Kidney issues, cancer, chemo, radiation, etc. on 8/3.  Those of us close to him certainly knew things were very complicated, and he just kept fighting after every Hospital visit.

You can never prepare yourself.  :(

I have also been working to stay in touch with his family, and I now care for his fun dog Hopper.  A 4 year-old Border Collie compared to my 12 year-old Whippets.  Lots of fun, but quite a difference!

So, those still watching: thanks for your patience.  After Sunday (the Memorial) I will relax a bit, and get back to these tasks.

Wednesday, July 20, 2011

now that PDXLAN is over...

and I have caught up on some sleep, I will be getting some "final" photos out of the finished case.

Weighing the choice between White sheet backdrop with the silver case, or black sheet backdrop against the silver case.

Leaning towards black, any input?

White sheet pro: black radiators will stand out against it
White sheet con: silver case won't be as contrastY

Black sheet pro: silver case will be very constrastY, and will look sharp IMO
Black sheet con: black radiators will kind of blend in depending on angle and flash

Tuesday, July 12, 2011

cementing on the final trim for the PSU

after that cures (probably overnight, there are 6 pieces and I don't want them shifting) I will finalize my transport locking pins to keep the Radiators in place.

I needed a way to keep the from sliding back out when I have it by the handle, so a little 4-40 threaded bolt, drill, and tap and I should have a pretty compact, simple, and stealthed locking method.

See that soon!

Monday, July 11, 2011

nearly time for PDXLAN 18

got some finishing touches to get done before Friday:

1. finish PSU trim, have to recut one piece and then time for adhesive to set up.
2. brushed over the corner/side aluminum with gritty abrasive pads (first Maroon, then White): still looks a bit "used" but "abused"
3. softened the look of the metallic paint on my exhaust fan grill with abrasive pads (White only)
4. flashlight check for any leaks, loose barbs, zip ties, etc.

Ran Age of Conan on High settings last night, played up to level 14, no real issues since the BSOD and installing that internal fan.

Finish pics will come when I get those PSU trip pieces on.

Thanks for reading!

Thursday, July 7, 2011

first BSOD

not unexpected, but it did occur.

Reasons:
1. small-ish Heatsink on NB/SB/Vreg area, stock on the Gigabyte, but very few builds would have such limited case ventilation
2. my case was closed up, see item #1
3. my one exhaust fan only moves about 24cfm (80mm, moderate rpm, low noise like this: JabTech Anodized Sunbeam fan) refer to item #1 for specifics
4. I had been playing DDO at Max DX11 settings with 4XAA and 16XAF, max particles, etc. for about 4 hours.
5. since the big radiator fans are OUTSIDE the case, there is very little "system" cooling. Item #1 should be referred to.

;) 4 hours is certainly enough time for a low ventilated case with vregs, NB/SB, SSD, HDD, and passive gains to add up and push past stable temps.

Overall, minor issue to open the lid during extended gaming sessions

Tuesday, July 5, 2011

Furmark temps

the first run the GPU topped out at 68C.

I tried to log speedfan, but it's not writing a log file even after I selected all my CPU, SYS, and GPU tick boxes for logging.

So here is the screeny of my SECOND Furmark run, it actually hit 70C:


You can see in the settings block I chose my native resolution, no AA, standard Benchmark run (no preset), and to the right hand block my score was 1904.

The GPU-Z file for the run has no pagination, so I have to sift through and get the columns aligned for it to make sense.

some benchmarks to start

for those looking to go ITX, and wonder about comparable performance in such a small package, I wanted to show how the H67 chipset does with no OC (so far, I can multiplier OC, but that is coming later).

Remember, this is a stock 2500K, 2X2Gig DDR3 at 1333, and my Intel 160Gig X-25 G2 SSD.
The motherboard can do SATA6Gps, and I might go to 2X4Gig DDR3 later.
I also offers USB3 with two ports on the back.

Here are the first group of Benchies:
WEI


ATTO before I ran TRIM manually

You can see a pretty dramatic WRITE dip at 4K, and an odd READ drop at 4G.

ATTO after TRIM is run manually

That 4K dip is pretty much gone, and the 4G dip is reduced.  My write speeds are pretty consistent at 110-112MB/s.  About what I think to see with 51% SSD used by OS and a couple Games.

HDTach, running in XP mode and Admin mode, after Trim

For a SATA-3 product, it might not max out the channel, but it runs pretty consistently across fill states until I approach 75% full (I haven't recently, but I did briefly when I had LOTRO installed).

I will get to some other of the common benches, however I don't yet have a SATA6 or a native USB3 device to really push those limits, yet.  ;)

Saturday, July 2, 2011

reinstall after all

"no more rhyming, and I mean it!"

"anybody want a Peanut?"

even though I got desktop, and my WEI scores looks fine, the new system just behaved...oddly at time.

So I drug out my Win7 install, and got back to a fresh install.

My lacking Center channel audio seems to be due to a problem with my Psyko headset, since my Zalman 5.1s operate fine.

My video/audio hitching seems to be due to some driver/codec issue from the motherboard change...all fine now after fresh OS, fresh MPC-64-HC, and fresh K-Lite pack installs.

My lackluster NIC performance seems to be due to some driver/hardware issue from the motherboard change.  All fine now.

Scores look the same, but USE is normal as expected going from 12 threads down to 4 cores.  ;)

My RAM is currently my lowest WEI score at 7.5 since it's getting downclocked to 1333 (highest the motherboard can do) instead of the 1600 Tri-Channel settings of the X58 board.

Small, portable, quiet, nice temps, all a good changeover except for Thread count: CPU not linens.  :P

Thursday, June 30, 2011

was supposed to be posted last night, but Blogger was down.

Pretty incredible to power up and have my OS intact!  Note to self: going from X58 to H67 means no reinstall (so far).


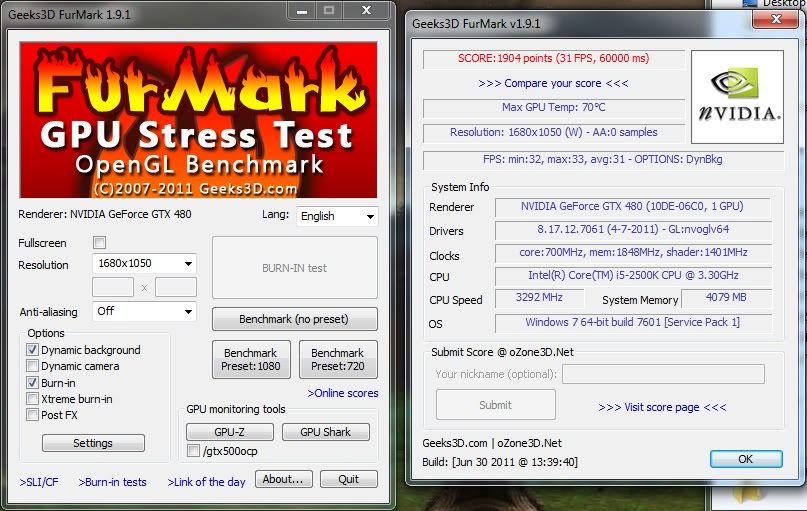
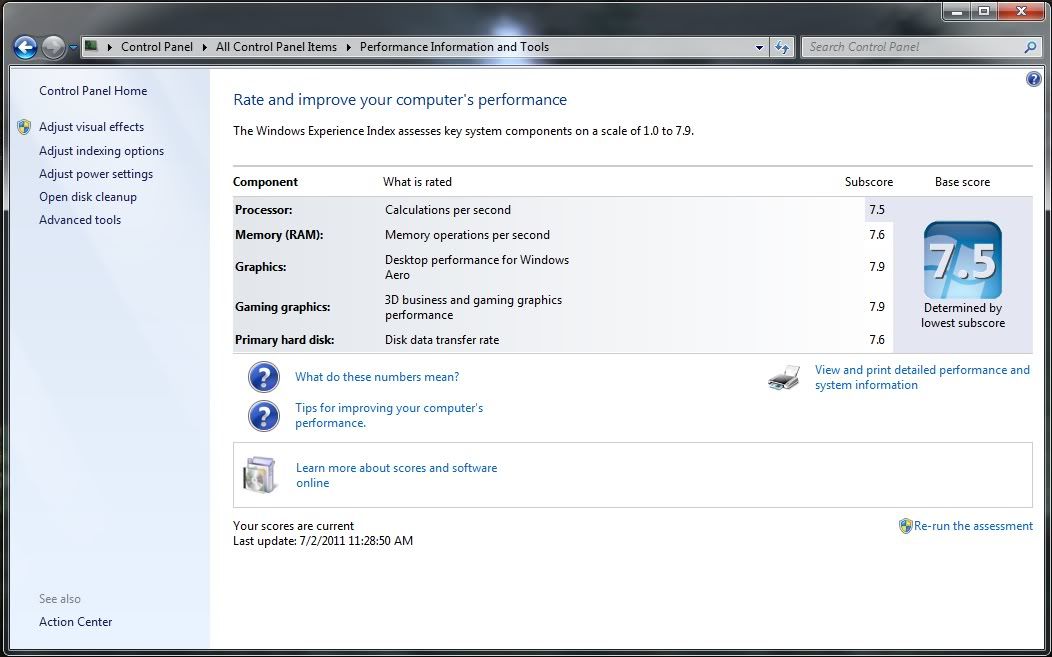
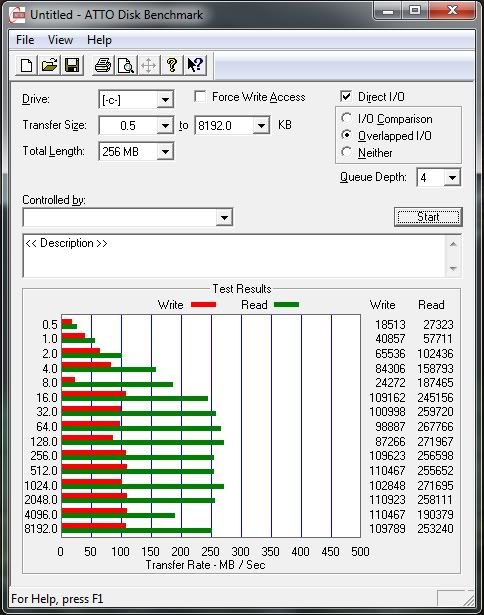
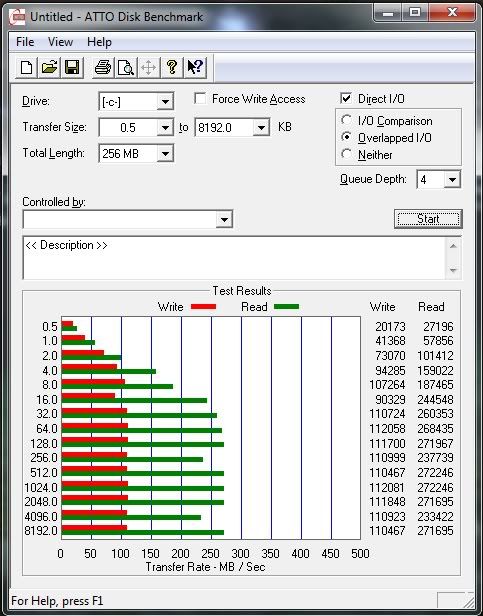
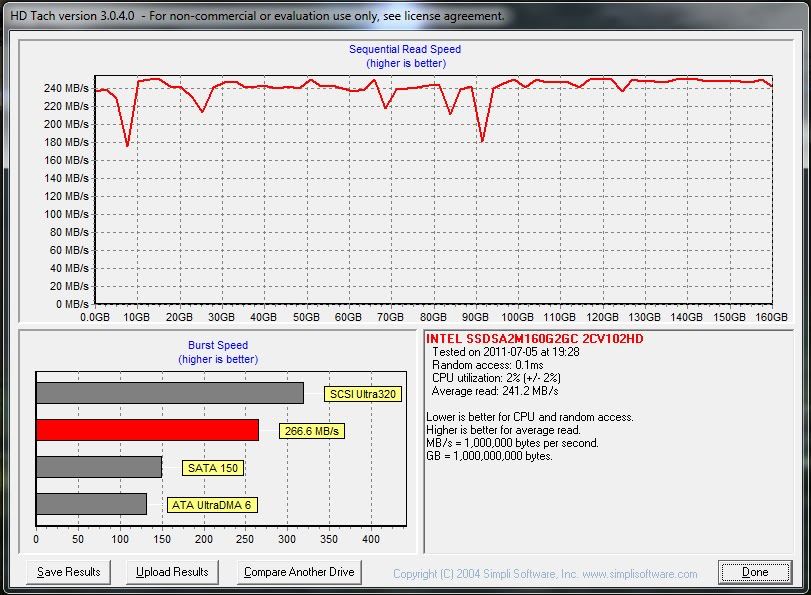
Performance looks where it should be, no issue except my TB Hitachi doesn't seem to list POST in AHCI mode.


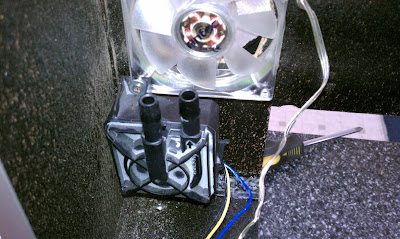
Pump is almost purged and not so Whooshy anymore.


I need to finish the trim pieces that will go around the PSU.


I need to drill my retention pin system for keeping the RadBay doors closed while I carry it.


Everything else worked out like I knew a little something about what I was doing!  :)  Throughout the planning, fitting, cutting, etc. I had numerous thoughts that it "all seemed to be going pretty smoothly" considing I had ONE case, didn't have to recut or cover some cosmetic mistake, and all my wiring just...worked.


Now, I did destroy my first PSU, the Enermax, when I melted a switch that took over 700F from my soldering iron to get apart.  But seriously, that PSU was like 6 years old!


I didn't buy a new PSU.  I didn't buy a new GPU.  I didn't buy new RAM.  I didn't buy a new CPU block.  I didn't buy a new SSD.  I didn't buy a new storage drive.


Sponsors (in one fashion or another) provided:
Motherboard by Gigabyte
RAM by Crucial
Storage Harddrive by Hitachi
Monitor is still my 22" by iZ3d
Keyboard is my Ideazon won in PDXLAN raffle
Mouse is GX700 by Logitech
Headphones are Psyko 5.1s won in PDXLAN raffle
Radiators and fittings by DangerDen


Getting back into modding has been a nice process, even if I was stressed at times.  But here I am, ready for Guild Gaming tomorrow night on my Refreshed Rig, and over 2 weeks before the LAN to finish my few, small tasks.


Thanks for watching...check back as the LAN approaches since I will be putting together more complete internal shots and going back over some of the "tricks" I used that I didn't stop to cover these last couple days.


Mod'on

Wednesday, June 29, 2011

It turned on!


Watching case temps carefully since I only have a 25cfm 80mm drawing exhaust from a less-than-ideal location. So far all the components are working. Me happy!

EDIT 4:19pm.  Didn't even have to reinstall windowz!  Going from an X58...to the H67, I had my external BD/DVD drive hooked up to the USB3 port (since it's USB3 ready) but the drivers won't do OS install from that port I guess.  But I got login and desktop, put the OEM driver disk in, and it's at desktop and I'm typing this on it.

My pump still is bubbly and making all kinds of whooshy noises, but weird loops like this take quite a while to get the microbubbles out in my experience.

WOOOOOOOOOOOOOOOOOOOOOOOOOOOOOOOOOOOOOOOOOOOT!

Running Windows Experience Index (not a great benchmark, but at least it breaks out to some subsystems:
1. 980X CPU was a 7.9: 12 threads   2500K CPU is a 7.5.
2. 6Gig Tri-Channel DDR3 was a 7.9  4Gig Dual-Channel DDR3 is a 7.6
3. 480GTX for both graphics scores is unchanged (not CPU bottlenecked) at 7.9
4. SSD for Primary disk is unchanged at 7.6 (not Sata6Gps)
Published with Blogger-droid v1.7.2

fluid, purge, fluid, purge, fluid, purge

the above is my process to eliminate bubbles in the horrible layout that is required to actually FIT the stuff into this case:
the pump circuit is not ideal
the GPU is inverted and the highest point in the system
the radiadors share a tube along the BOTTOM
the T-line is right above the pump outlet with a 90 going to the GPU

the loop goes something like this:
pump up to T-line 90 to GPU
GPU DOWN to CPU central inlet
CPU outlet DOWN to right side Radiator
bottom of right side radiator along bottom of case to bottom of left side radiator
left side radiator top hook back down to pump.

hump hump 90 up, hump CPU hump radiator, hump radiator, hump back to pump.

after turning the external PSU (so I don't fire up the motherboard with an air-filled loop) can only run about 4 seconds before it sucks so much air I worry for the bearings, then tilt, let the bubble move to the T-line, then open T-line and fill back to top.

Repeat about 95 times...really, over 2 hours, not kidding here, 9pm to almost 11:30pm.  Flick PSU, watch bubble, tilt case, take plug out of T-line, use syringe to fill T-line, put plug back in T-line, Flick PSU, repeat.

ONE    Quarter-sized    BUBBLE    AT     A    TIME.

I finally got to let it run for about half an hour before I was tired of looking at it.

Am I done yet?  :)

Monday, June 27, 2011

ugh...am I done yet?

I am so excited to be close to putting fluid in this sucker...but a bit tired of having my hands on it so much and my kitchen counter totally repurposed for it.

I don't think any of my previous Mods have required so many Install/remove/reinstall/repeat (maybe the doors on Lubic Zen-Feng, but that was a long time ago to remember exactly).

I probably put the radiators in and out 20 times before I got to mounting the Power supply, which probably went in and out 20 times before I moved on to the motherboard plate, which probably, blah blah blah, exhausted.

It's not the endless hours of filing like Bloodmoon, or the tedium of buffing like HTPCylon, or the tiresome superglue and optics on Lubic's starfield...but everytime I pick up the motherboard again, I might ding it, everytime I put the Video card back in I might drag it along the CPU posts.  I hope it all works when I hit the button!

Tomorrow might be fluid and pump purging (crossing fingers!).

Step by step install test

I tried to take similar shots of each step from my ladder. Here is each stage of putting the hardware in minus fluid and harddrives.

First the case legs and power supply.
Second the motherboard without video card.
Third the left side radiator.
Fourth the right side radiator.
Fifth (not taken yet) the video card.

I have more shots to post as well as a video showing the completed tubing movement. Stay tuned!
Published with Blogger-droid v1.7.2

Pump mount + radiator slides + tubing = success!

Woot! omg it actually works!
Published with Blogger-droid v1.7.2

sponsor bump

just wanted to drop an additional note for those companies that helped with the current project:
Gigabyte-motherboard- ITX H67 USB3, etc.
Crucial-RAM - DDR3 Tracer in Red - originally a 3X2Gb set for my X58 build, but now using 2X2Gb.
Danger Den-140mm Radiators, fittings, waterblocks of old, fluid, tubing and other stuff over the years
Hitachi-1TB drive-ok, so it's not Sata-6Mpbs, but the original, enterprise class, 64Mb cache 7200 rpm drives are all still going strong.
Intel-technically not a sponsor of the project, but my previous CPU was won in the raffle at a PDXLAN, so...they deserve some credit on that one.  :)
Logitech- what can I say about all my Logitech product support?  Keyboards, Mice, speakers, headsets, remote controls, the list goes on.  It started with the first G-15 (the Bath'leth I call it) and on through my current fave mouse the G-700.

I can't begin to count the cost/value of all the products provided, destroyed, modified, overclocked, painted, cut apart, and hotglued.  Thanks to all my Sponsors for helping with my destructive hobby!  ;)

Finally got the pump mounted.

It looks like a really odd place, but it will make some sense soon.
Published with Blogger-droid v1.7.2

Port opening nearly done

I have a little more filing and finishing to get the lid to rest properly. But close.
Published with Blogger-droid v1.7.2

Sunday, June 26, 2011

Finally working on gpu

Sad time...but I had to suck it up and take snowblind apart. Mounting the gpu brace has been tricky but I think my solution will do three job.
Published with Blogger-droid v1.7.2

Undercoating done

Looks pretty good to me. It will be pretty hard to see any of it though.
Published with Blogger-droid v1.7.2

Undercoating done

Looks pretty good. Hard to get even coverage when you can't move you r target piece and it's a foot deep.
Published with Blogger-droid v1.7.2

Saturday, June 25, 2011

Case prep for install

Masking and more masking. Had to cover everything that I wanted to stay clean. Took a while but I got a pretty good setup for spraying the undercoating on the inside.
Published with Blogger-droid v1.7.2

Friday, June 24, 2011

Fatality! Scratch one psu.


Not positive, but I think the dead power supply might have relationship to this messy leaky capacitor?

EDIT:  OMGOMGOMGOMGOMG.  Yes, I am stupid sometimes.

The mounting brackets use button head bolts and square nuts (I already had them, just, work with me here).  ONE of the brackets has ONE bolt/nut that was pressing down on the Capacitor on the left side of the photo.

How did I discover this when I thought the PSU was dead?  I went to plug my drill into the same outlet the PSU was in...and it was dead too.  GFCI had tripped.

So I opened up the PSU, tested fine.  Took the brackets off, shell back on, tested fine.  Only one bolt/nut was anywhere near anything, so I opted to remove that bracket entirely, put the others back on, put the whole thing back together, tests fine.

UGH...stupid stupid stupid.  :P
Published with Blogger-droid v1.7.2

Much work! Me do lots of stuff!

Got the motherboard in thursday so I could mount the waterblock and start final location for the backplane.

It can be really tricky to cut, file, smooth, and align it without overcutting.

Hold in place: mark: drill one: hold up in place again: mark: drill second: rinse repeat.

Working in a case made of particle board and aluminum sheets that only holds its shape when all latches are closed...very careful before deciding.

Before I took the shots of the mounting I probably put it in and out 15 times. Angle at the plugs; alignment for microphone jacks; dremel cut to remove the end flare of the I/O shield; adhesive to hold the shield in place; more and more until it JUST fits (still about 1mm I would adjust).

More coming: busy weekend so I can get wiring and tubing going.
Published with Blogger-droid v1.7.1

Wednesday, June 15, 2011

First door assembly

Got my first radiator door panel fitted and put together with e6000 adhesive. They turned out pretty well. I always wish for laser-like fit but it looks alright.
Published with Blogger-droid v1.7.0

Tuesday, June 14, 2011

Work starts again!


First I marked out a scrap piece of plastic. Drilled and tapped for my standoffs.


I decided I needed support for my gpu during any transport bouncing and so I bent a 90 that will cup over my waterblock.


Then I did some fitting to check clearance and harddrive location.

It's getting really hard to take photos between the funny lid arrangement and the cramped space. ;)

More coming!
Published with Blogger-droid v1.7.0